Bentley Seed Co. Blog

Planting the Past with a “Three Sisters” Garden

Bentley Seed Co. Blog

Planting the Past with a “Three Sisters” Garden

by Lucinda on May 31 2022
Three Sisters garden with corn, squash and beans The history around our small community of Cambridge in northern New York is rich with agricultural lore and legend dating back centuries. The area was originally home to the Iroquois Five Nations, who were a mix of farmers, gatherers, fishers and hunters.  The earliest and most important of Native American agricultural traditions was the custom of The Three Sisters. The Iroquois of the northeast, along with the southern Cherokee tribes, practiced companion planting of corn, beans and squash together in a sustainable and resourceful system that not only provided a healthy diet but also kept the soil rich and bountiful.  Called “The Three Sisters” because the three plants nurture each other symbiotically, this tradition played a critical role in the Native American garden. This trio of plants thrived especially well together and provided high-yield, highly nutritious staples of their diet, and most efficiently utilized the land. These early farmers saved the best seeds from each harvest for the following season, resulting in the development of strong seeds ideally suited for the environment in which they had adapted. By the time European settlers reached the area, the indigenous people had developed the growing of these three crops into a central food system that the new settlers quickly adopted.  Iroquois women traditionally tended the fields. In the late spring, they tilled the earth, planting corn in small, mounded hills first. A few weeks later, they planted beans in the same hills with squash circling the border of the mound. The cornstalks served as poles for the beans to grow upon, the beans stabilized the corn and supplied much-needed nitrogen to fertilize the soil for the corn and squash. The squash leaves provided ground cover for the corn and beans delivering shade and weed control. These three plants thrive better together than when planted alone.  Planting a Three Sisters plot is a delightful way to honor American history and create a healthy garden. You will need a fairly large garden plot as these plants need to spread out a bit to flourish. Mound the soil about a foot high at the center and 3-4 feet wide, flattening the top of each mound at the center. Space your mounds at least four feet apart. Pearls and Gold Corn Start with hearty sweet corn with robust stalks for the beans to twine around. Plant the corn after the last frost of the season. Dig a small hole in the center of your mound and add a couple of corn seeds to each mound.  Bean – Kentucky Wonder Pole Bean Seed When the corn seedlings are about 3-4” tall, plant your beans in the same mound. Select a pole bean, not a bush bean. Our heirloom variety Kentucky Wonder is a great choice—its tall, vigorous vines produce delicious beans that have been enjoyed for generations! Plant three or four bean seeds around each corn seedling. Early Summer Crookneck Squash A week later, plant your squash circling the outer edges of the mound. Choose a small-leaf variety such as our Black Zucchini or our Early Summer Crookneck. Space squash seeds evenly around the perimeter, creating six plantings (you might want to add a couple of squash seeds to each planting to ensure germination).  Adding sunflowers alongside your mounds will attract pollinators and distract birds from the Three Sisters seeds while making your garden especially pretty. Plant the sunflowers at cross-sections between your mound hills. Pick from our bright yellow Lemon Queen, our staff-favorite Mammoth Seed, colorful Autumn Beauty, or better yet, choose our Sunflower All Sorts Mix to fill your garden with a gorgeous mix of sunflowers of all sizes! Planting a classic Three Sisters Garden is a wonderful family project, rich in storytelling, American history and gardening lore, along with important environmental teachings on sustainability, biodiversity and lessons in keeping your garden soil healthy.
5 Great Good-Things-to-Grow Gifts for Mom
Spring Pea Salad

Bentley Seed Co. Blog

Spring Pea Salad

by Nina on Apr 11 2022
Recipe for a beautiful Spring Pea Salad.
Earth Day

Bentley Seed Co. Blog

Earth Day

by Lucinda on Mar 14 2022
Earth Day is celebrated every year on April 22nd. From its beginning in 1976, Bentley Seed Co. has been at the forefront of the sustainability movement. Just six years after the first Earth Day, Bentley Seed Co. opened its doors with a commitment to selling heirloom and open-pollinated varieties that are naturally disease- and drought-resistant
Sweet and Savory Herbed Shortbreads

Bentley Seed Co. Blog

Sweet and Savory Herbed Shortbreads

by Lucinda on Dec 20 2021
One of our favorite parts of the holiday season is baking and sharing cookies, especially if we can incorporate some little part of our gardens into our baking sessions. Because we love the buttery richness of shortbread and because they are super easy to make, this year, we chose to update one of our favorite shortbread recipes with the addition of herbs from our windowsill herb pots. We also created a new savory shortbread cracker recipe that we know will be a big hit at our holiday parties all through the season. Or just a really yummy snack for those of us celebrating remotely again this year.  We used sage, rosemary and thyme herbs which you can grow from our Holiday Essential Grow-Stix Kits. But use any combination or favorites for your recipes. We have a number of herb combination packs or single packets so you can create your own combinations. Make one or both and let us know how you liked them! We love the lemony goodness of this cookie. The perfect sweetness balanced with the fragrant addition of fresh in the decorative tops make it simply the best cookie for the holidays and any other occasion throughout the year. Lemon Herb Shorties Rosemary, Thyme, and Sage Lemon Herb Shorties Ingredients Christmas Cookie Cutters in dough Decorating the cookies with herbs Fresh out of the oven! So many fun ways to decorate with herbs Fun and festive cookies! Herb cookies We love the lemony goodness of this cookie. The perfect sweetness balanced with the fragrant addition of fresh in the decorative tops makes it simply the best for the holidays and any other occasion throughout the year. Ingredients: 2 ½ cups all-purpose flour 1tsp salt 1 cup unsalted butter (2 sticks) softened to room temperature 1 cup superfine or powdered sugar 1 egg 1tsp vanilla 2 tsp lemon zest (1 lemon) 2 tsp fresh lemon juice 8 or 9 sprigs of your choice assorted herbs (for the holiday version of this recipe we’re choosing rosemary, thyme and sage) 1 egg white ½ tsp water Steps: Whisk together the flour and salt in a medium bowl and set aside. Blend the butter and sugar in a large bowl with either a hand or a standing mixer. Add the egg, vanilla, lemon zest and juice and mix until creamy. Slowly blend in the flour and stir until a smooth dough is formed. Mold into a round or square log and wrap snugly in plastic. Chill for an hour or overnight. Meanwhile, remove the thyme, rosemary leaves from their stalks into separate bowls, add another small bowl of sage leaves to your prep station. Here’s a quick and easy tutorial for removing them from their stems. Preheat the oven to 375°. And line baking sheet(s) with parchment paper or favorite silicone baking mats. Turn dough out onto a lightly flour-dusted surface and roll out to about ¼” thickness and cut into shapes using cookie cutters of choice. Transfer to baking sheets and whisk together egg white and water just until blended.  Brush tops with a light sheen of egg white/water mix. Sprinkle or strategically place your herb leaves on the cookie tops and gently press into place. If you want to get fancy, you can sprinkle a little pinch of coarse or sanding sugar on each cookie for a bit of sparkle. Bake for about 15-17 minutes (checking frequently toward the end) until the edges are golden brown. Thyme Rosemary Sage Parsley Savory Herb Shortbread Crackers Our savory take on a favorite shortbread cookie, these crackers are going to become a sure favorite! Use any combination of herbs that suits your fancy. We chose a nice combination of parsley, thyme, rosemary and oregano for a super herby flavor. Ingredients: ·   1 cup packed with grated good Parmigiano-Reggiano cheese ·   2 cups all-purpose flour ·   3 tbsp fresh thyme leaves ·   1/2 tsp garlic salt ·   1 cup cold unsalted butter, cubed ·   24 sprigs of parsley, thyme, rosemary and oregano ·   2-3 tbsp coarsely crushed pink peppercorns (depending on taste) ·   1 tsp flaked sea salt Steps: Preheat the oven to 350° and position the rack in the center. Line the baking sheet with parchment paper of favorite silicone baking mats. Pulse cheese in a food processor until finely ground. Add the flour, thyme and garlic salt. Season with a pinch or two of black pepper. Pulse again a few times to combine. Add cubed butter through the tube while pulsing until all is combined. The dough will be a bit crumbly but that is fine. Transfer the dough to the pan(s) and press over the flat surface of the bottom. Smooth the top with a glass or a small roller. Score the surface into 24 squares or rectangles and arrange or sprinkle herbs onto each square/rectangle. Gently press the herbs into the dough and dust with pink peppercorns and sea salt. You may need to score the surface one more time to ensure the crackers break evenly and easily. Bake until the top is just a tad golden brown for about 25 minutes. Immediately cut your squares/rectangles with a sharp knife while hot. Turn off the heat and return the pan to the oven to cool completely. For a crispier crunch, leave the pan in the oven overnight. Store crackers in an airtight container at room temp.
Super-Simple Herbalicious Christmas Side Dishes

Bentley Seed Co. Blog

Super-Simple Herbalicious Christmas Side Dishes

by Lucinda on Dec 15 2021
Herby Christmas Side Dishes including Sweet Turnip Galette and Easy Herb Roasted Carrots.
3 Simple Steps to Winterizing your Compost

Bentley Seed Co. Blog

3 Simple Steps to Winterizing your Compost

by Lucinda on Dec 01 2021
Final cool-weather veggies harvested? Check! Garden put to bed for the season? Check, check! Now it’s time to get your compost winterized before it gets any colder. Discover 3 simple steps to make it easy to protect your precious compost through the winter!
Pumpkin Mac & Cheese: Fall’s Favorite Comfort Food!

Bentley Seed Co. Blog

Pumpkin Mac & Cheese: Fall’s Favorite Comfort Food!

by Lucinda on Oct 07 2021
Pumpkin Mac & Cheese: Fall’s Favorite Comfort Food! This is the easiest and most delicious recipe we can think of for fall comfort food… straight from the garden sugar pumpkins, baked, pureed, and blended with a bit of pasta and cheese to make a bowl full of ultimate fall yummy goodness!
The Best-Ever Homemade Canned Salsa

Bentley Seed Co. Blog

The Best-Ever Homemade Canned Salsa

by Nina on Aug 19 2021
Best salsa recipe- tastes even better than store-bought!!
Pepper Jack, Herb & Zucchini Bread

Bentley Seed Co. Blog

Pepper Jack, Herb & Zucchini Bread

by Lucinda on Aug 04 2021
Anyone can make a sweet zucchini bread… Try something different! Well, it’s that time of summer once again when you probably have a plethora of zucchini ready to use RIGHT NOW! August 8th is National Sneak a Zucchini onto your Neighbor’s Porch Day so that’s one way to use some up. Or you could bake up a batch of bread with those delicious and oh-so-versatile veggies. Everyone has a tried-and-true sweet Zucchini Bread recipe, but do you have one for a savory Zucchini Bread in your recipe box? Here is an easy & deliciously simple recipe. Feel free to experiment with different cheese like a nice sharp cheddar, a creamy gouda or asiago and parmesan depending on your preference. Also play around with your fresh herbs. We like chives for this recipe, but you can use whatever herbs you have an abundance of—thyme, basil, sage, or rosemary, or a mix of whichever suit your fancy! Pair a bit of basil & a little rosemary with the parmesan & asiago, try some fresh sage with that sharp cheddar (add a small pinch of cayenne for a little kick!). This recipe has a lot of latitude, so have fun & mix it up! Pepper Jack, Herb & Zucchini Bread Ingredients: 2 cups grated & lightly squeezed zucchini 4 tbsp finely chopped fresh chives 2 large eggs 3/4 cup plain Greek yogurt 1/4 cup melted unsalted butter 1 1/2 cup grated pepper jack cheese 2 cups all-purpose flour (plus a bit more for dusting the pan) 1 1/2 tsp baking powder 1/2 tsp baking soda 1/2 tsp salt Directions: Preheat oven to 350° Grease and lightly flour a standard loaf pan Melt butter and set aside to cool slightly In a large bowl, stir together zucchini, chives, eggs, yogurt & butter Whisk flour, baking powder, baking soda & salt in a separate small bowl Gently fold the dry ingredients into the zucchini & herb mix Fold in the grated cheese Bake for 50-60 minutes until a knife slipped into the center of the loaf comes out clean. Top with a bit more grated cheese and a sprinkle of fresh herbs and pop back in the oven for an additional 10 minutes Ingredients for Pepper Jack Herb Cheese Zucchini Bread including Argyle Cheese Farmer Greek Yogurt Pepper Jack Herb Cheese Zucchini Bread fresh out of the oven
Nina's Garden Fresh Pesto

Bentley Seed Co. Blog

Nina's Garden Fresh Pesto

by Nina on Jul 13 2021
Nina’s Garden Fresh Basil Pesto Recipe Garden Fresh Pesto – Nina Ossont Ingredients:• 3 cups packed fresh basil leaves• 4 cloves garlic• ¾ cup grated Romano cheese• ½ cup olive oil• ¼ cup pine nuts• ½ cup chopped fresh parsley (Optional) Use Bentley Seed Herb Seed to grow your own Basil and Parsley! Steps:1. Combine basil, garlic, Romano or Parmesan cheese, olive oil, and nuts in the bowl of a food processor or blender.2. Blend to a smooth paste.3. Add parsley if desired. Pesto is one of my favorite things to make from my garden. My Genovese Basil was ready to harvest, so I decided to make some fresh basil. As luck would have it, I also had my Ace 55 tomatoes and parsley ready for harvesting as well. Its a truly lovely thing to walk out to your garden to get the things you need for a meal, especially on these warm summer days where you can smell and almost hear the humidity. What is really fun about herbs is you can trim them throughout the season, and they come back continually. I can be particularly precious about my plants, but I know I will get more parsley and basil if I stick to trim what I need when I need it, as well as keeping it from flowering. I decided to make pesto pasta for lunch for myself and my cousin Becca who was home with a tiny new baby named Ada. We are both ¼ Sicilian in our heritage and are very picky about Italian cuisine. Becca is a superior cook, but I wanted to make something for her as she now has her hands extra full! When I make pesto, I always use Romano cheese. I just think it has a great deep flavor. Sometimes I am more liberal with the oil. I ended up making a large batch- in for a penny in for a pound, right? My little Cuisinart 3-Cup Mini-Prep Plus Food Processor is not ideal for this much work! After this adventure I quickly upgraded to a large food processor. Maybe I should invest in the much larger Cuisinart 14-Cup Custom Food Processor. It’s so satisfying to smell fresh basil in the kitchen. Once all the basil, garlic, Romano cheese, olive oil, pine nuts, and parsley were blended, I tossed some into spaghetti, and topped it with a few chopped Ace 55 tomatoes. We had a lovely visit between the baby’s feeding times eating lunch on the shaded patio. It was a perfect way to spend a summer afternoon! Fresh Basil from Nina’s garden from Bentley Seed Genovese Basil Seed Pesto in Progress Processing the Pesto – we need a bigger Cuisinart! Pesto Pasta with Fresh Tomato’s from Bentley Seed’s Ace 55 Tomato Seed
Lucinda’s Herby Citrus Grilled Vegetables Recipe

Bentley Seed Co. Blog

Lucinda’s Herby Citrus Grilled Vegetables Recipe

by Nina on Jul 12 2021
Lucinda’s Herby Citrus Grilled Vegetables Lucinda’s Herby Citrus Grilled Vegetables •¼ cup olive oil•2 tablespoons orange blossom honey•2 tablespoons fresh lemon juice•Zest of one lemon•2 garlic cloves, minced•1 tablespoon chopped oregano•2 tablespoons chopped parsley•1 teaspoon chopped thyme•½ teaspoon salt•¼ teaspoon ground black pepper•2 medium zucchini, sliced lengthwise•2 medium yellow squash, sliced lengthwise•3 peppers, (2 sweet, 1 mild-hot) sliced lengthwise•1 eggplant, sliced•1 sweet onion, thickly sliced Steps:1. Whisk together olive oil, honey, lemon juice, lemon zest, garlic, oregano, parsley, thyme, salt & pepper in a medium bowl.2. Toss sliced veggies with honey mixture until fully coated. Let sit at room temperature for at least 1 hour.3. Preheat a large grill pan over medium-high heat. Add vegetables, and sauté for 2-3 minutes or until as tender as desired. As soon as my long-time friend Lucinda shared this recipe with me, I knew I would love it. Herbs, citrus, and honey marinade- it just sounds like a summer-grilling winner. I had so much fun preparing it with my kids—they are 10 & 12 now so any job I can delegate to them I will! 10-year-old Tristan trimmed the thyme, the two kinds of parsley (Italian and Curled, because why not?) and oregano. We have an herb garden, and I was so happy I had all the herb ingredients on hand. It was sprinkling out, so rinsing off the herbs was a breeze! I chopped the herbs and the veggies while 12-year-old Rowan juiced the lemon. I was very careful not to touch my eyes after chopping the jalapeno we choose to use for our hot pepper. Lucinda recommends milder poblanos for hot peppers and I can see why after eating our result! Rowan whisked the herbs, oil, lemon, honey and garlic minced garlic together. Almost forgot the garlic, I feel like that is something I regularly do. I don’t know why, it’s so fun to use the garlic press. I highly recommend the Williams Sonoma Stainless-Steel Garlic Press! It’s so heavy duty and a cinch to clean. The whole family has been cooking a lot together since the pandemic and it’s been a very wonderful bonding experience for us. Gardening and eating what you grow has been such a simple way to find normalcy and calm during the past 18 months. We tossed our veggies and marinade together and placed them into the refrigerator for about an hour. Then my husband time took over with the grilling. As the onions came off the grill I started popping them like candy. They were so very sweet in the summery-est of ways. The honey was such a good call in the marinade, plus using the jalapeno as our hot pepper actually somehow infused a bit of heat to all the veggies, so they had this amazing honey sweet citrus spicy flavor. It was such a great taste, move over Bobby Flay! They kids loved it, I loved it and even my picky-eater husband loved it.We will be using this recipe again very soon—it’s the perfect go-to marinade on everything from veggies to chicken, pork or fish for all your summer grilling! Its super versatile too—simply switch up the veggies and herbs with whatever is in ready to harvest in the garden.  You might also want to try it on some grilled peaches and/or nectarines (minus the garlic of course!). Serve them with a scoop of ice cream for a new favorite summer dessert! Italian Parsley Thyme, Parsley, and Oregano Herby Citrus Marinade Sliced Vegetables Grilling Vegetables HERBY CITRUS GRILLED VEGETABLES
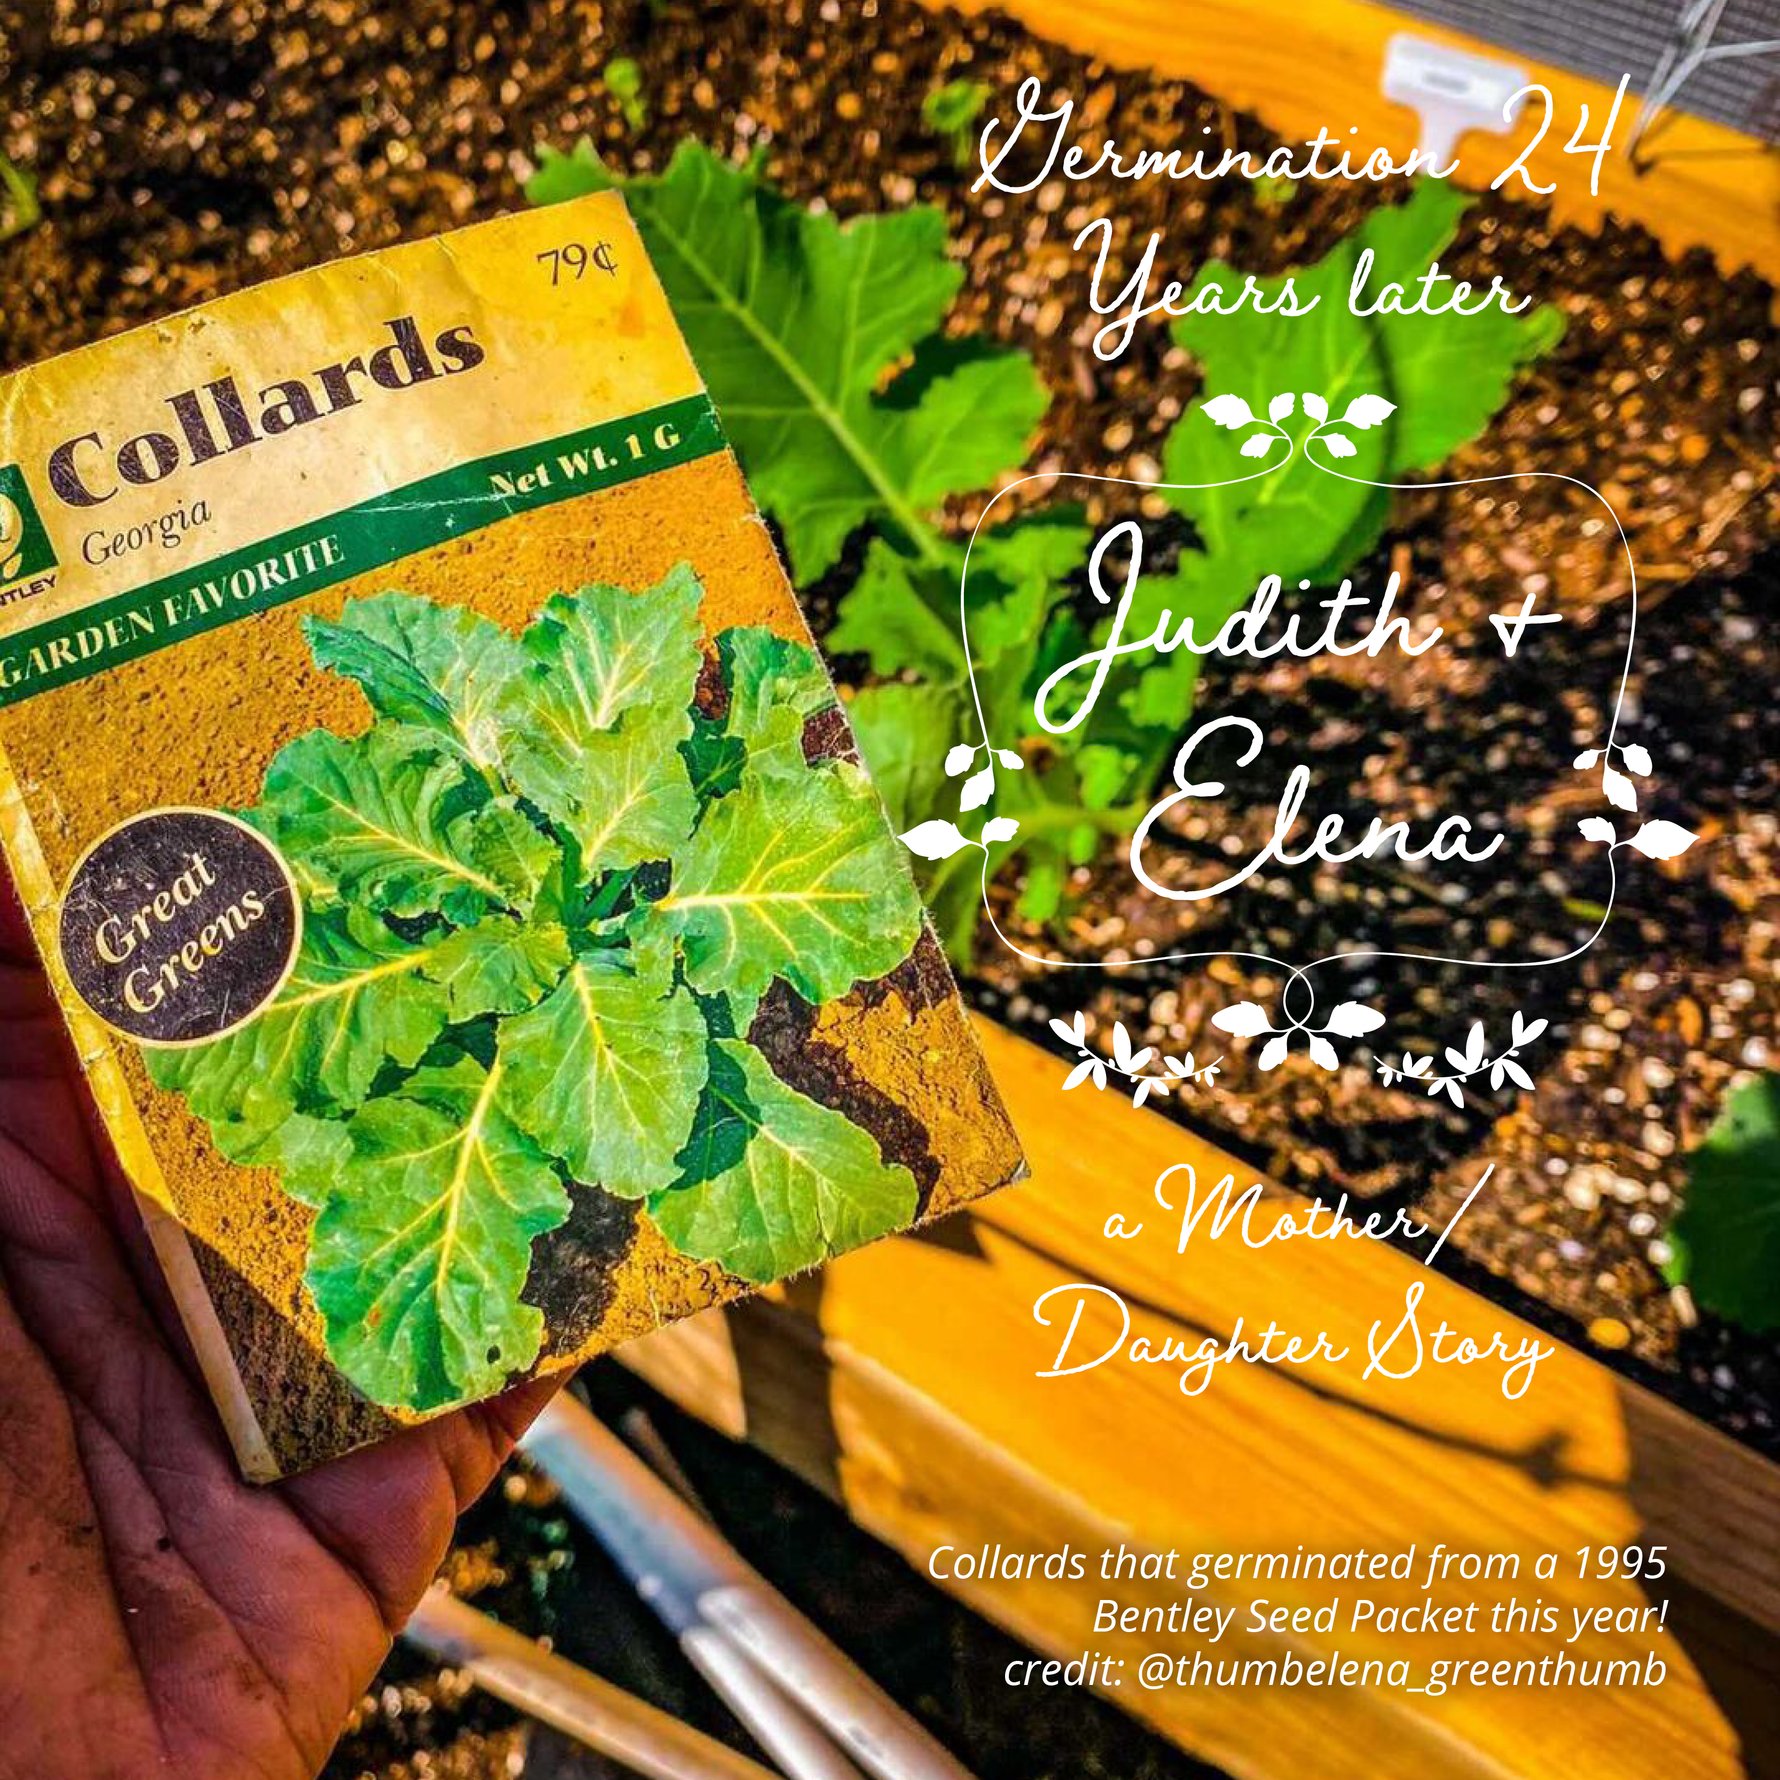
Germination 24 Years later, a Mother Daughter Story

Bentley Seed Co. Blog

Germination 24 Years later, a Mother Daughter Story

by Jeff Bentley on May 05 2021
  We recently received a message from Elena in Oakland, CA- @thumbelena_greenthumb. She said: “Hi there, I just wanted to reach out because I am amazed by your seeds germination ratio. My mother Judith passed away 24 years ago and had collected seeds. I found many packs she had over the years and just wanted to send this to you. Here is a pack dated 1995 and all of the collards I sowed germinated from her pack! These packs have helped our family keep a very special part of her going and that’s her garden.” From our CEO Jeff Bentley: “To have a seed germinate and grow after 25 years is truly a miracle. We are thrilled this happened with our seed and that it brought joy to Elena. ” Elena and her mother Judith's story truly touched us here at Bentley Seed, and we are honored she has allowed us to share her experience with you. .          
Creating a Family Vegetable Garden

Bentley Seed Co. Blog

Creating a Family Vegetable Garden

by Jeff Bentley on May 08 2020
Most of us look forward to spring with good reason: longer days and warm temperatures mean finally being able to ditch onerous winter outerwear and enjoy the outdoors again. Year in year out, we get through winter patiently (some of us more than others), cheered by the fact that we know it will end. We know our patience will be rewarded by brighter days ahead. Unfortunately and tragically, spring 2020 has not unfolded as expected. When we were looking forward to spring just a few short months ago, who could have imagined that it would arrive concomitant with a global pandemic that would shut down much of the world as we know it? Social distancing mandates, supply chain disruptions, and justified germophobia have suddenly changed the way we live. An obvious example of this is how we approach ‘hunting and gathering’ food to feed our family. Running to the grocery store to pick up a few necessities is suddenly not so simple. As a result, many of us are turning to an alternate food supply: one we produce ourselves. Given the time of year, growing vegetables from seed, in particular, is an obvious way to begin. In fact, we have it on good authority that the crisis has generated legions of newly minted home vegetable gardeners. Armed with a little knowledge and a few tools, it’s not hard to grow your own family vegetable garden. Here’s what you need to know on how to grow vegetables. Garden Design & Location Sunlight You don’t need a huge amount of real estate in order to grow your own veggies but you do need to have a sunny spot. With few exceptions, vegetable plants require six to eight hours of sunlight each day. Without enough sunlight each day, your plants will struggle to grow and won’t yield fruit. Water Your garden must be proximate to a source of water if you live in a hot summer climate with periodic dry spells. For many people, that means a nearby spigot hooked up to a hose. But there are other ways to collect and deliver water to your plants, such as a rain barrel; details can be found online. Well Drained Soil Such as all plants, when growing veggies, you need to make sure they are watered correctly, as they won’t tolerate too much water. Plant roots need well-drained soil to grow and thrive; standing water will cause them to rot. That means you shouldn’t plant in low lying areas or in non-porous clay soil that holds water. If you do happen to live in an area with heavy, clay soil, don’t fret, as there are ways to amend it to make it amenable to vegetable growing, as we explain in our related article, ‘How to Make Well-Drained Soil for Growing Vegetables’. Raised Garden Beds Alternatively, you can create raised garden beds in which to grow your crops, and in this section, we’ll give you some tips on how to grow vegetables. Though this may sound like extra work up front, in the end you’ll likely find that the benefits are well worth it: Enables good soil drainage Facilitates a longer growing season: Garden soil heats up faster in the spring and stays warm longer in the fall More efficient weed control Deters pests Container Gardening If you don’t have a lot of space and/or don’t want to bother creating raised garden beds, you can simply grow your plants in containers. The larger the container, the better, and they must have drain holes in the bottom. But, how do you grow vegetables in containers? The same guidelines outlined above apply to container gardening: fill them with soil that drains well, place them in a sunny location, and make sure your plants get enough—but not too much—water. It’s especially important to enrich container soil with nutrients via compost and apply fertilizer throughout the growing season. Gardening Supplies Seeds To get started on how to grow vegetables that are high quality, high-yield plants, you need to start with high quality seeds. And not all seeds are created equal. For best results in growing veggies—and, yes, we are partial to the Bentley Seeds brand—we recommend our non-GMO, open pollinated seeds. We source our seeds from reliable, regional American farms. They’re fresh crop seeds which boast a higher-than-average germination rate, increasing your chance of success. What & How to Grow Guide We know from experience that many novice gardeners are like the proverbial ‘kid in the candy store’: they want to grow everything they can possibly think of, without really knowing what they’re getting into. We get it. We’ve been there. Also, we understand, during this trying time, the impetus to grow as much as possible. But we do advise a tiny bit of caution. Before you buy your vegetable seeds, we recommend doing a little homework to learn how to grow vegetables and what is likely to grow best in your area, what plants grow best together, and other important information. You start by consulting our Growing Guides Leafy greens such as lettuce, spinach, and kale. Herbs, such as chives and basil, are easy, nutritious and pleasing to the palate. Root vegetables such as carrots, radishes, and beets. Or, if your kids like something simple, you can’t go wrong with fresh green beans. Don’t forget to plant some crowd pleasing fruit such as watermelon and tomatoes (yes, they’re a fruit.) Some flowers, such as french marigolds, make particularly good companions because they ward off pests. Or consider nasturtium which is both beautiful and edible. Enriched Soil and Compost Normally, it’s easiest for new gardeners to buy enriched garden or potting soil at your local nursery or garden supply store to mix into your garden bed or containers. Otherwise, you can use soil from your yard and homemade compost, though if you’re starting from scratch it will take some time to produce. If you don’t already have a compost pile, now is a good time to start one; it’s not difficult. Good, simple compost consists of a combination of green & brown food and yard waste that breaks down into rich organic material over time. You can find plenty of tips and instructions online. Fertilizer Once established, most vegetable plants need supplemental nutrients to help them grow. Under normal circumstances, we recommend buying timed-release organic fertilizer at your local store. However, if you are able to add enough rich compost to your soil, that may work as well. Mulch Mulch is an effective way to retain moisture as well as minimize seeds in your garden beds. Just about any kind of organic material, such as wood chips, straw or leaves will do the trick as will cardboard or newspaper which will break down over time. You can find additional information in our article, What is Mulch? Gardening Tools Veteran gardeners tend to collect a lot of gardening tools over time. If you’re just starting out, you’ll just need a few essential gardening tools: Shovel Trowel Gardening Gloves Pruners Ultimately, you’ll want to pick up additional tools—when shopping is not such a challenge—including a rake, a wheelbarrow and more. We also recommend finding a dedicated spot in your garage, shed or house to store the tools so you always know where to find them. Some Historical Context This moment in time, as it relates to people’s desire to be more self-sufficient by growing their own food, is not without precedent. It’s reminiscent of the Victory Garden initiative launched during World Wars I and II. The U.S. and allied governments encouraged citizens to plant vegetable gardens to supplement their food rations as well as to help their morale by staying busy during a very tumultuous and disturbing period. Veteran gardeners will tell you that gardening is a salve for troubling times. Not only is it productive and rewarding, spending time outdoors with your hands in the dirt, communing with nature just seems to make sense—even when nothing else does.
Creating a Hydroponic Garden

Bentley Seed Co. Blog

Creating a Hydroponic Garden

by Jeff Bentley on Sep 02 2019
In the last few years there has been a lot of chatter about hydroponics gardening, a method of growing plants without soil. Growers discovered a long time ago that some plants grow better in water than in soil. In fact, plants only need sunlight, water, and nutrients to photosynthesize; nutrients don’t necessarily have to come from soil. Today, many of the vegetables we buy at the store—including vine tomatoes—are grown hydroponically. Why, then, you might ask, does conventional wisdom dictate that gardeners grow plants in soil? There are pros and cons to each method, as discussed below. First, we provide a brief tutorial on hydroponic growing to enable a better understanding of how it differs from growing plants in soil. What is Hydroponic Gardening? Hydroponic gardening entails growing plants in a liquid solution consisting of water and nutrients (fertilizer)—in place of nutrients typically found in rich soil—along with an inert medium to serve as an anchor to support the roots. The growing medium delivers the necessary moisture and oxygen that allow the plants to grow.  Note that there is a particular type of hydroponics system, called aeroponics, that doesn’t use a growing medium; it only uses a liquid solution (described below). For a conventional hydroponics system, there are all kinds of inert growing media that can be used. Popular material include rockwool, grow rock, perlite, coco fiber or chips, vermiculite, pine shavings or bark, gravel, and sand. The key characteristics of a good growing medium is that it won’t decay and break down quickly and won’t absorb so much liquid that it becomes soggy. Roots need to be moist but not soaked; otherwise they’ll rot. Types of Hydroponics Hydroponic systems come in two general forms: passive or non-recovery, and active or recovery. In one type of passive or non-recovery system, the nutrient solution is absorbed by one or more wicks or by the growing medium. You can’t cycle or reuse the solution; it’s in the medium. In active or recovery systems, a pump actively moves the solution. Here, a nutrient solution recirculates, much like water in a fish tank. Active systems tend to be more effective as they will consistently supply adequate oxygen to root systems and your plants will be more likely to reach their fullest potential. Passive systems can become water-logged wet and fail to provide enough oxygen. The Wick System In this passive, non-recovery system, the nutrient solution travels, by way of capillary action, from the reservoir to the roots through a wick—candle or lantern wicks work great. This system is inexpensive and simple to set-up and maintain. However, passive systems run the risk of keeping the growing medium too wet and, thus, are not the most efficient manner of hydroponics. The Ebb And Flow System This active system uses a submersible pump to move the nutrient solution into a tray positioned above the reservoir which holds the plants. When turned on, the pump fills the tray until liquid levels reach an overflow pipe and drain into the reservoir. Typically, the grower keeps the pump on for about a half-hour (one “flood cycle”). After the flood cycle, solution will drain back down through the pump. During flooding, stale air is removed from the roots by the rising nutrient solution. When the nutrient solution drains, oxygenated air is pulled into the growing medium. The results are well-oxygenated roots ready to maximize nutrient absorption. The Ebb and Flow system works best with rockwool or grow rocks as a medium and is a highly effective system, overall, and simple to maintain. Nutrient Film Technique (NFT) NFT is an active system using a pump and recirculated solution. Here, the pump pushes solution into a grow-tube in which the roots are suspended. This tube is angled so the solution washes the roots and falls back into the reservoir. This can be done all day, every day. Roots still need oxygen, so grow-tubes are often filled with capillary matting or air stones (typically used in fish aquariums). The plants are supported by collars or in a grow-basket. No grow medium is used in this system, which is highly effective. However, because the system lacks a growing medium, any significant interruption to the root wash can result in dried-out roots which could be the death of your plants. Continuous Drip Another active system, the continuous drip system, uses a pump and supply lines to each plant. Each line typically uses a drip emitter, which can regulate the amount of solution each plant receives. A drip tray beneath the plants catches the solution and returns it to the reservoir. Continuous Drip systems work best with rockwool, but any medium can be used to good results due to the degree of control gardeners have thanks to the drip emitters.  Advantages of Hydroponics Plants grown hydroponically have been shown to mature 30-50 times faster than plants grown in soil—a significant difference Along with a faster grow time, hydroponic plants will typically have a greater yield, possibly due to extra oxygen in the various growing media that stimulate root growth. If your roots are getting more oxygen, they’re able to absorb nutrients more quickly. And when mixed with water, root systems are directly fed—there’s no need for the roots to “search out” nutrients from soil. Consequently, the plant doesn’t need to expend as much energy to get the food it needs. In turn, all that excess energy is routed into growing faster, and with better yields. A smaller root footprint means more plants per square foot leading to increased yields (an important point if you’re growing in constrained space, like indoors). Since hydroponic growing is easiest to do indoors, you’re not susceptible to the vagaries of the weather and can grow plants year round. An added and important advantage of hydroponic plants is they have fewer issues with pests, fungi, and disease since they’re grown in a controlled, more hygienic environment. Disadvantages of hydroponics gardening Potential cost of equipment Hydroponically grown plants typically require more care and attention than their conventional, soil-grown brethren. DIY Hydroponics GARDENING SYSTEM While you can buy a hydroponics kit, you can also create your own DIY passive system for a fraction of the cost of buying a kit. There are various online resources to help you get started, depending on the volume of plants you hope to grow. Basically, though, you’ll need the following: Watertight growing container(s) Some type of growing medium—there are plenty of inexpensive or free options, some of which were listed above Hydroponics gardening nutrient mix—you can buy a premixed solution or create your own. The latter requires some research to make sure you deliver the necessary nutrients to your particular plants  Clean water If you’re growing plants indoors, you’ll need adequate sunlight or artificial grow lights Related to the last point listed above, growing plants successfully indoors—whether via conventional or hydroponics gardening means—is challenging, particularly when it comes to ensuring they get enough light. Unless you have a greenhouse or an indoor garden area in front of large south-facing windows, you will have to invest in grow lights. You also need to manage the ambient air temperature and humidity. In winter in northern climes, to make sure it’s not too hot, cold, or dry. Growing Plants Hydroponically — From Seed One of the best things about growing plants from seed is that you can choose the EXACT variety you want; you’re not at the mercy of your local nursery’s stock choices. In addition, seeds cost very little, compared to the plant starts you can buy at the store. Combining the benefits of growing plants from seed and growing plants hydroponically is a win-win. Once again, you will need to do your research to help ensure your success. Seeds are very sensitive and need just the right amount of light, heat, moisture, and oxygen in order to germinate and grow. Also, choose carefully which plants you want to grow. If you’re planning to grow vegetables, we recommend starting with ones that are easy to grow such as leafy greens like lettuce or spinach or herbs. Once you’ve done that successfully, you can branch out into other green delicacies. In recent years, as consumers become more interested in where their food comes from, there has been increased interest in hydroponics as a sustainable method of gardening in small spaces. It’s not a new method of growing crops; it’s been around through the millennia. With good reason: it works.

The Real Deal On Native Versus Invasive Plants

Bentley Seed Co. Blog

The Real Deal On Native Versus Invasive Plants

by Jeff Bentley on Aug 15 2019
Bentley Seeds seeds comprise both native and naturalized plant species. If you have any questions about any of the plant species represented in our mixes, we encourage you to check with your local county cooperative extension service or conservation district to verify that they haven’t been classified as invasive in your region. Invasive plant species and the harm they cause to the local environment are increasingly making headlines. The steady stream of bad news about invasives taking over and crowding out native plants is causing widespread anxiety among gardeners. Not only are some currently waging war in their own backyards with these uninvited visitors, others worry about contributing to the problem, by planting them unknowingly.  Unfortunately, much of the news about invasive plants contains conflicting information that’s short on details, leaving many people confused. We aim to alleviate some of this confusion by sharing some key definitions and facts. Invasive Plant Species According to the USDA Forest Service, invasive plants are: “Non-native (or alien) to the ecosystem under consideration; and, whose introduction causes or is likely to cause economic or environmental harm or harm to human health. (Executive Order 13112).” With globalization and widespread international travel, non-native plant species have long made their way into the U.S. The good news is that most foreign plant species—naturalized plants—are not invasive and don’t cause problems. Those deemed invasive share common traits:  They easily adapt to new environments They grow and reproduce rapidly Their exponential growth allows them to quickly colonize large areas Aggressive colonization crowds out native species They have few natural predators to keep their numbers in check They’re difficult to eradicate Kudzu (Pueraria montana) As invasive plant species take over local landscapes, they wipe out native plants and cause a catastrophic decline in biodiversity, disrupting the entire local ecosystem.  Some well-known examples of invasives include the fast-growing vine, Kudzu (Pueraria montana), which arrived in the U.S. from Japan in 1876. Often referred to as ‘the vine that ate the South,’ fast-growing Kudzu was originally planted by farmers to address soil erosion, but quickly spread out of control. Garlic mustard (Alliaria petiolata) Another example is the dreaded and prolific garlic mustard (Alliaria petiolata) which is reported to have first shown up on Long Island, New York, in 1868. Garlic mustard has proliferated in vast areas of the northeastern U.S., crowding out important native plants. There are hundreds of other examples of invasive plant species likely growing in your region. Some invasives closely resemble native species. For example, there are the pale lilac-colored phlox that grow wild along roadsides in many areas in mid-summer. Except those wildflowers are not actually phlox: they’re 4-petaled members of the infamous, invasive, wild mustard family, and are called dame’s rocket (Hesperis matronalis). ‘Real’ garden phlox flowers have 5 petals. Though pretty, similar to other invasives, dame’s rockets are aggressive growers and will take over, given the opportunity.  Naturalized Plants Non-native plants that become established in a particular region without human aid are also known as naturalized plants. While some of these plants become invasive, as described above, the majority do not. For example, many of the food crops grown in the U.S. originated elsewhere, as did such garden favorites as English roses. Native Plant Species Goldenrod (Solidago virgaurea var. leiocarpa) Native plants, on the other hand, are defined by various natural resource agencies as those that are indigenous to or are naturally occurring in a particular U.S. geographic area; they weren’t introduced from foreign lands by humans. Examples of well-known native plants include Butterfly Weed, New England Aster, Black Eyed Susan, and Purple Coneflower. Native plants play an important role in the ecosystem by supporting local wildlife. Some native plants that grow and spread rapidly are deemed ‘aggressive native plants’. Examples include goldenrod and common milkweed (which is actually classified as noxious in some states; see below). While you probably wouldn’t want to plant these flowers in your neatly-cultivated garden beds, they play an important role in attracting and sustaining pollinators and other wildlife. Noxious Weeds Poison Ivy (Toxicodendron radicans) Some plants are classified as noxious weeds in some areas of the country. Noxious weeds can include native or non-native plant species and aren’t necessarily invasive. The word noxious comes from the Latin word—nocere—to harm; therefore, defining these plants as causing harm. Examples include poison ivy, ragweed, and poisonous plants such as bittersweet nightshade. As mentioned above, milkweed is also classified as a noxious weed in some parts of the country—in spite of the fact that it provides critical sustenance to the endangered monarch butterfly—because it’s poisonous to domesticated livestock. Consult Your Local Cooperative Extension Service   The bottom line is each region in the U.S. is challenged by a different set of invasive and noxious plant species. The ultimate authority on the issue is your local cooperative extension service or conservation district; they should be your first stop, to answer any questions you might have about your own garden. Understand that establishing a definitive catalogue of all problematic plant species in a given region is a moving target, especially given changing climate conditions. It would be wise to check in frequently with these local authorities to stay on top of what’s what in your particular ecosystem.
What is Mulch? (And Answers to Other Common Garden Mulch Questions)

Bentley Seed Co. Blog

What is Mulch? (And Answers to Other Common Garden Mulch Questions)

by Jeff Bentley on Apr 25 2019
What is Mulch? Mulch refers to different types of protective material gardeners spread on top of garden soil. Many people use natural, organic material such as compost, shredded wood, wood chips, pine bark, leaves, or straw because they offer an additional benefit of returning nutrients to the soil as they decompose. Newspaper and cardboard are also good mulch material that decompose over time. People also use inorganic materials such as landscape fabric, plastic, or stone, or some combination thereof to ease maintenance and fight particularly stubborn, invasive weeds. Consult any gardening expert and you will hear about the benefits of mulch. Mulch is a key element for successful gardening: it helps keeps the soil cool and moist in the heat of summer, and insulates against the cold in early spring and fall. Mulch also suppresses weeds that compete for precious resources such as water and nutrients and helps prevent soil compaction and erosion. If you’ve done your research, you probably already know by now that you need to mulch. But, what may not be clear is how—exactly—to go about applying mulch. And, what should the mulch be made of? Where should you get it? When should you mulch? What else do you need to know about mulch? We have some answers to help you get started. Which Type of Mulch is Best? Generally, we recommend using organic mulch since it decomposes naturally and supports the ecosystem.Therein lies the rub, though: since it decomposes, it must be replenished regularly—which in many cases would be at the start (and maybe the finish—more on this later) of the gardening season each year. While that may sound like a lot of work to the uninitiated, remind yourself that you didn’t take up gardening because it was easy… procuring and spreading a fresh layer of mulch every year is just part of the job. The effort is well worth it, in terms of decreased maintenance and better plant growing outcomes and a natural garden aesthetic. So, the question becomes which type of organic mulch do you use? There are many options, a few of which we listed above. Among the most common are shredded wood, wood chips or pine bark: they’re relatively inexpensive and easy to obtain. They also do a good job protecting your garden plants and suppressing weeds, though they don’t return as many nutrients to the soil as some other organic materials. Shredded fallen leaves make excellent mulch if they’re dense enough to remain in place and you don’t mind the way they look. Otherwise, you could add a thin layer of shredded wood, wood chips, or pine bark on top of them. As we mentioned above, you can use everyday household materials such as discarded moistened newspaper and cardboard which are safe for the garden and decompose naturally—though more slowly than the organic materials mentioned above. Arguably more unattractive than leaf waste, you could also camouflage and weight them down with a thin layer of wood mulch or straw. Where to Get Garden Mulch Wood based-mulch and straw are generally readily available from local and commercial sources. For mulching small areas, you can buy wood product mulch in two-cubic-foot bags from your local garden supply store. For larger areas (and to avoid all that plastic) you can also buy mulch in bulk, sold by the cubic yard. One cubic yard of mulch is equivalent to 13.5 bags of mulch. There are also likely sources of free wood mulch near where you live. If you live in an area where there are a lot of trees, there is undoubtedly ongoing tree work which produces a plentiful supply of leftover wood chips. Many municipalities stockpile wood chips for use by local residents. Otherwise, you might contact local commercial tree services and find out if they have a supply of free wood chips to give to a good home. (If so, you will probably have to pick up a load yourself from their premises unless you can cajole them into dumping a load in your yard if/when they’re in your area). You can also ask your neighbors if they have any to spare. How Much Mulch Do I Need? For best results, spread a three-inch layer of mulch over your garden soil. If you’re dealing with an existing garden with mulch that simply needs refreshing, then add however much is needed to bring the mulch thickness to three inches. In either case, that raises the question of how much mulch you’ll need to procure in total. To figure that out you need to get at least a rough idea of how many square feet of garden area to cover—obviously, a tape measure is a handy tool for this purpose. Then, multiply the total garden area square footage by the inches of mulch depth needed to come up with the total amount. You’ll then need to convert the total feet to cubic yards. Don’t worry if you’re not a math whiz!  ‘Mulch Calculators’ abound on the internet and will do the work for you. Alternatively, any commercial garden supplier should know how to do the conversion and tell you how much mulch to buy. Here’s a quick reference chart outlining how much mulch you would need for a 4’ x 10’ garden bed: 4’ x 10’ = 40 square feet 40 x 3 inches/mulch = 120 square feet of mulch needed Mulch is typically sold at garden supply stores in 2 cubic foot bags. For the garden size outlined above, you would need to buy 15 bags of mulch. For larger areas, you can buy mulch in bulk — by the cubic yard — but many bulk mulch suppliers require a 3-yard minimum for delivery. 3-yards of mulch at 3 inches deep would cover 324 square feet of garden area. How to Mulch? Once you’ve gotten ahold of some mulch, you can spread it on your garden beds, at will. There’s no way of getting around the fact that mulching is a physical-labor-intensive process. Obviously, having a sturdy wheelbarrow and good garden gloves and garden implements will help. You can spread the mulch in stages; it doesn’t have to be done all at once. The tricky part is being sure to spread the mulch evenly throughout your garden beds. And be sure not to pile up mulch high against the base of your plants; that may cause them to rot. Leave a tiny bit of space around the plant stalks. When is the Best Time to Mulch? The best time to mulch is in mid-spring before the weeds have a chance to gain a foothold in your garden. Don’t mulch too early in the spring while the ground is still really cold or you may end up delaying or preventing your perennials’ re-emergence by trapping cold moisture in the soil. Spring is a busy time so don’t worry if you don’t get to it until after the arrival of summer. Like many things in life, applying garden mulch will be better late than never. In some areas of the country, gardeners apply a thin layer of mulch in the fall to provide extra winter protection for their plant roots, especially newly-established plants. The mulch layers should never be more than three inches, so be sure to add extra mulch judiciously. Once you’ve done it, you’ll realize there’s really not much to mulching your garden beds—except for the physical labor, that is. The trick is sourcing high quality, inexpensive mulch and figuring how much you need in the first place. You will find that the effort is well worth it.
9 Cool Ideas for an Eco-Friendly Wedding Celebration

Bentley Seed Co. Blog

9 Cool Ideas for an Eco-Friendly Wedding Celebration

by Jeff Bentley on Mar 15 2019
So you’ve made the decision to tie the knot—congratulations! As a major supplier of custom seed packets for weddings and bridal showers, we have the privilege of talking regularly with brides and grooms in the midst of planning their weddings, giving us a bird’s eye view into current trends shaping the industry. Even though we’ve been doing this for a while, we continue to be impressed by how wedding celebrations are evolving and becoming more and more personalized to reflect the wedding couple’s values. For example, these days, many couples are designing their wedding celebrations to reflect their passion for healthy living, sustainability, and the environment. Here are some really cool green wedding trends we’ve witnessed: In general, there is increasing interest in reducing the environmental impact of wedding celebrations, in any way possible. Many couples are choosing to serve locally sourced food, with vegetarian courses figuring prominently on the menu. Increasingly, brides are forgoing traditional bouquets consisting of exotic flowers from some far-flung source and substituting them with native, seasonal varieties instead. Some brides are eschewing fancy, white dresses, mass produced overseas, for something simpler and more sustainably made. More and more weddings are being held during the day, outdoors and/or in rustic settings in order to use less energy. Similarly, couples are endeavoring to keep waste generated by the event to a minimum by using biodegradable service ware and composting leftovers. Traditional cut floral centerpieces and decorations are being replaced by locally sourced live plants that can be transplanted into the ground sometime after the wedding festivities are over. Couples are opting for personalized, unique, earth-friendly wedding favors. Custom seed packets are given to guests as a special memento and are often included in a gift bag, as part of each table setting or mailed with a thank you note, to cite a few examples. Speaking of seeds, another current trend is to ask for plants beneficial to the environment, In lieu of traditional material goods such as china, appliances or furniture. Alternatively, many couples are encouraging well-wishers to donate to a cause, such as the Sierra Club, about which they are passionate. We really love hearing about these great ideas and appreciate the sentiment behind them: an overriding concern for the environment. After all, what better time to be looking forward than on your wedding day?
How to Make a Garden Bed

Bentley Seed Co. Blog

How to Make a Garden Bed

by Jeff Bentley on Mar 15 2019
Fall is a great time not only to plan for spring planting, but also for garden preparation including the design and creation of any new beds you’ve been thinking about. Advanced planning and preparation will give you a jump start on planting seeds in early spring to maximize the growing season for all those gorgeous plants you’ve been fantasizing about. Before you start, following are some key considerations important for garden success. What to plant in your new garden? Do you want to plant flowers or herbs and vegetables or some combination thereof? Based on your answer to the above, do you know how much space you need? Depending on the magnitude of your desired floral display or the volume and variation of vegetables, it will help to map out how much space each plant will require and plot the dimensions of the garden bed accordingly. Your seed supplier can provide guidelines on plant spacing. Where will the new garden bed be located? Many plants need at least six hours of sunlight, including most vegetables. Do you have a sunny spot in your yard large enough to accommodate your new garden as envisioned above? Is the new garden plot in reasonable proximity to a water source? It needs to be convenient or else you’ll be tempted to skip the regular watering necessary for your plants’ optimum health. Supplemental watering may be particularly important for raised beds, depending on your climate and weather. Speaking of which, you need to decide whether you’re going to go to the extra effort to create a raised garden bed; if so, we have provided some guidance below. Otherwise, we recommend you test your soil to see what sort of amendments it may need, for best results. Raised Garden Beds Raised garden beds offer advantages over ground level beds including: They allow you to use a rich, custom soil mix They allow for better drainage Elevated soil warms up sooner in the spring and stays warmer longer in the fall They’re easier to maintain both because they don’t allow adjacent lawn to encroach and they’re easier to reach for planting and weeding. If you’re unfamiliar with raised garden beds, you can think of them like large immovable ‘containers’ set up semi-permanently in one spot in your yard. They are typically square or rectangular in shape with a depth of at least 6” to accommodate plant roots. A rectangular shape provides for a larger garden since the bed should be no wider than 3’ for ease of use. There are practically endless ways to design raised garden beds. While the sides of the ‘containers’ can be made out of a wide variety of materials, many people make them using lumber planks—stacked 2 x 4’s, for example. If this is what you plan to do, it’s important to choose untreated rot-resistant wood for this purpose, particularly if you’re planning to grow vegetables. Over time, pressure-treated lumber will leach harmful chemicals into the soil which, in turn, will be absorbed by your plants’ roots, which, in turn, when end up in your body when you consume the vegetables. In any event, there is plenty of information online about other materials you can use to make raised beds and how to construct them. Preparing the Garden Area—Removing the Grass If you’re creating a ground level garden bed out of lawn, the first thing you have to do is remove the grass where the bed is supposed to be. There are different approaches for removing grass sod once you’ve marked off the dimensions of your garden: Obviously, you can simply dig it up with a shovel. There are pros and cons to doing this. On the pro side, it will provide quick results, allowing you to proceed with the preparation of your garden bed. On the other hand, digging up sod is backbreaking work and not for the faint of heart. It helps to water the area a few days ahead of time to moisten (not soak!) the soil to loosen it up. If you’re creating a large bed, it might make sense to rent a mechanical sod cutter. This method will strip away organic nutrients from the soil, along with the sod, however, which means you will have to add it back in via additional compost and other rich organic material. Use a heavy duty rototiller (with a rear tine). This may also be hard work and may require more than one pass. The advantage of rototilling is the sod gets turned under—rather than removed, leaving organic matter in the soil. The bad news is that weeds get turned under also and will undoubtedly make an appearance, stronger than ever, down the road. Or, if you’re prepared to wait awhile, you can smother the grass by covering the planned garden bed area with plastic, newspaper, cardboard or even a heavy dropcloth (weighing down the edges, of course) which will eventually kill the grass but leave the soil structure intact. You may be tempted to use herbicide but please don’t—it’s harmful to you and the environment. If you’re creating a raised bed that’s at least 8” deep, the grass will most likely die on its own, though you can add a layer of insurance—literally—by laying down biodegradable landscaping fabric first, before constructing the container, installing it in the footprint of the ‘container’. Preparing the Soil for Planting As mentioned above, if you’re creating a garden bed at ground level, even if it seems like your soil is good, it’s a good idea to have it tested to see if it’s missing key nutrients your plants will need. Your local Cooperative Extension Service office may be able to help with that or refer you to a soil testing service. Or, if you don’t want to bother with that, skip that step and add rich, organic matter such as compost, preemptively. If it’s heavy clay, you will want to mix in some lighter material such as peat moss as well, though you should be aware that it will lower your soil’s pH, which may or may not be a good thing depending on what you plan to grow. Thoroughly work the organic material into the soil, breaking up compacted clumps of dirt and clay. If you’re creating a raised bed, you need to fill it with a mixture of basic soil and rich organic material as described above. You can also mix in leaves and grass clippings. For either kind of bed, add a layer of mulch to protect the soil during the winter months. And, that’s it. Your garden bed will be ready for planting when it starts to warm up in the spring.
Growing Herbs and Winter Garden Vegetables

Bentley Seed Co. Blog

Growing Herbs and Winter Garden Vegetables

by Jeff Bentley on Mar 15 2019
Admittedly, we write a lot about gardening, especially on how to grow vegetables in the northeast, which makes sense when you consider that we’re located in upstate New York (generally zone 4-5, depending on the elevation). However, we recognize that many of our customers are fortunate enough to live in climates mild enough for an extended gardening season, allowing you to grow vegetables throughout the winter. In nod to you lucky folks, following is a beginner’s guide to growing winter vegetable crops in zones 7-10. Choose Cold Weather Crops As a starting point, we’ll focus on growing vegetables—and herbs—that can tolerate cool winter temperatures. And, obviously, since there is great variability in fall temperatures between zones 7-10, you’ll have to use your best judgement to decide when, exactly, to plant your seeds. Changing weather patterns make traditional planting schedules unreliable; your local cooperative extension service might be able to help. The important point is that you want to give the seedlings time to establish themselves before the first hard frost, which is usually 8-10 weeks. On the other hand, you don’t want to plant cool weather crops too early because they won’t germinate effectively in the heat. Local Growing Conditions will Vary We provide a list of cold-hardy herbs and vegetables below, but keep in mind that local conditions (elevation, rainfall, wind, etc.) will affect your crops differently, as will the exposure where you’ve planted them in your yard. Ideally, you would plant a winter vegetables in the sunniest spot available. One of the biggest challenges of growing crops in winter is that daylight is in short supply, causing many plants to grow more slowly than they do in summer; maximum sunlight is important. Waning daylight is another reason to ensure your young plants are established before winter begins in earnest. Planting a Winter Vegetable Garden If you’re interested in how to grow vegetables effectively, experienced gardeners recommend planting vegetable crops—but particularly winter vegetable crops—in raised beds. This is especially important If you live in a rainy climate, as the raised beds allow for effective drainage. Plants hate having soggy roots!  Raised beds also make it easier to cover your crops to protect them during cold snaps—an important point for those of you in zone 7. On the flip side, plants in raised beds can dry out more quickly than those in the ground, which requires vigilance in watering during dry periods. Compost-rich soil is particularly important for winter vegetables, as is a healthy layer of mulch. Don’t add fertilizer when you plant your seeds; wait until the seedlings’ true leaves appear. Then apply a long-lasting organic formulation that’s not to heavy on nitrogen (which makes plants more susceptible to the cold). Any kind of mulch will do; many experienced gardeners swear by dead leaves gathered during fall clean up or straw. With edible crops, it’s always a good idea to plant in waves—particularly with green leafy vegetables—so you’re ensured an uninterrupted harvest throughout the winter. Tactics for Protecting Plants during Cold Snaps As mentioned above, those of you in zone 7 must have a contingency plan for protecting your crops during cold snaps. There are a variety of tactics you can employ including: Cover them with an extra layer of leaves or straw Use temporary row covers (these can be repurposed old sheets) Protective cloches to serve as mini–greenhouses. These can take many forms including glass domes, overturned baskets, used milk/soda jugs, etc.) Just be sure not to leave the protective covers on too long, once the freezing threat has passed, as plants need air circulation in addition to sunlight to grow! It may also be necessary to protect your young plants from intense rainstorms in certain regions of the country. Hardy Winter Herbs and Vegetables Herbs and vegetables that can tolerate the coldest temperatures (as low as 10°F) include the following: Chives Cilantro Collards Kale Leeks Onions Parsley Scallions The next-cold-hardy group (down to 20°F) includes: Arugula Broccoli Brussel sprouts Winter cabbage Winter cauliflower Chard Spinach Slightly less-cold-hardy (down to 25°F): Beets Carrots Fennel Lettuce Radishes Rosemary Thyme Of course, those of you in cooler USDA zones can try growing these winter vegetables as well—many gardeners do—but it requires much more effort and vigilance to keep the plants safe during the sustained cold periods common in northern winters. You would need to construct semi-permanent cold frames or hoop houses to protect your crops not only from the cold and wind, but from potentially heavy, damaging snow. Cold weather gardening in the northeast is definitely not for the faint of heart. The rest of us will get vicarious pleasure thinking about those zone 7-10 winter garden crops you “southern folk” are able to grow.